¶ Introduction
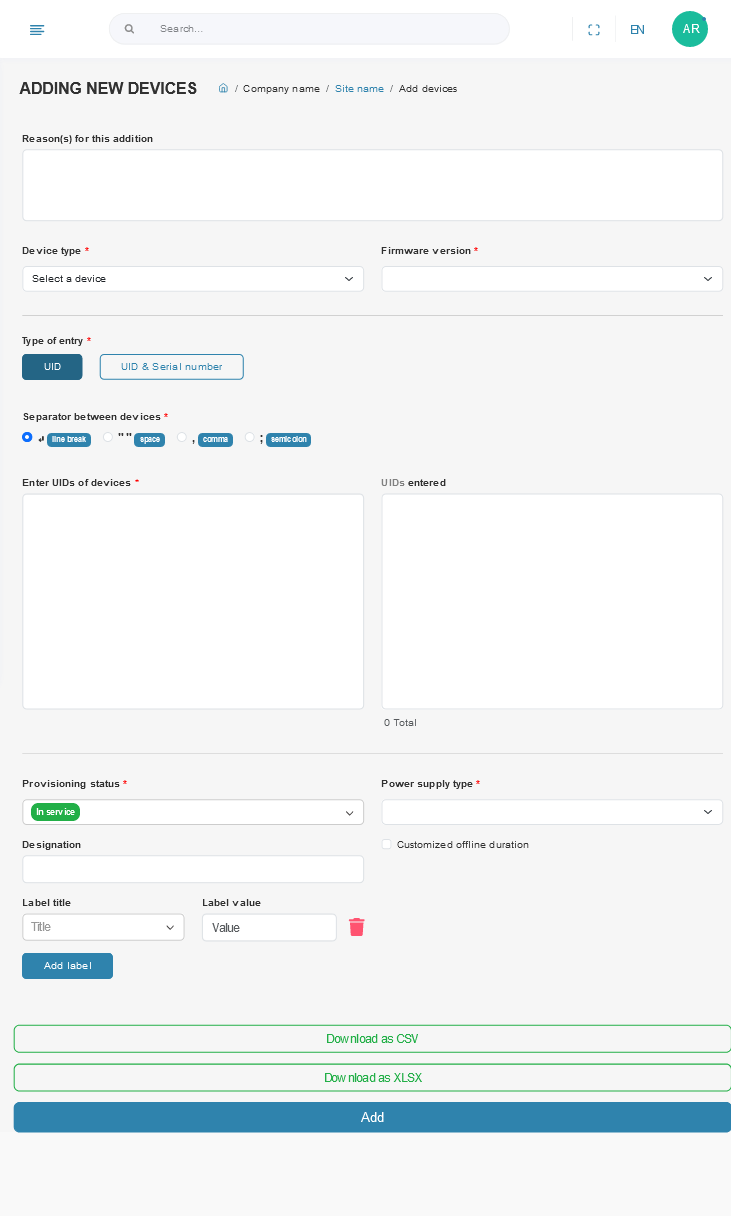
To access this page, click on "Add" in the sidebar, under the name of the site where you want to add your devices. You will then arrive on a page that looks like the screenshot below:

¶ Adding sequence
¶ Step 1 (optional) : Reason for addition
We strongly advise you to specify the context in which these devices were added, as this will be useful when you consult your site's history to trace the evolution of your fleet. For example, you can specify where these tags will go, whether they are new or replace others, etc.

¶ Step 2: Device type
You can only add devices of one type at a time!
In this step, you choose the type of devices you want to add to your site.

¶ Step 3: Software version
Selecting the wrong software version can lead to partial or total failure of communication with added devices!
If the device type has several versions, you need to select the right one.

¶ Step 4: List of devices to add
In this step, you will enter the list of identifiers for all the devices you wish to add. You can use either UIDs or serial numbers. Depending on the supplier, either one will suffice, with automatic matching, or both will be required.
¶ Case 1: Automatic correspondence
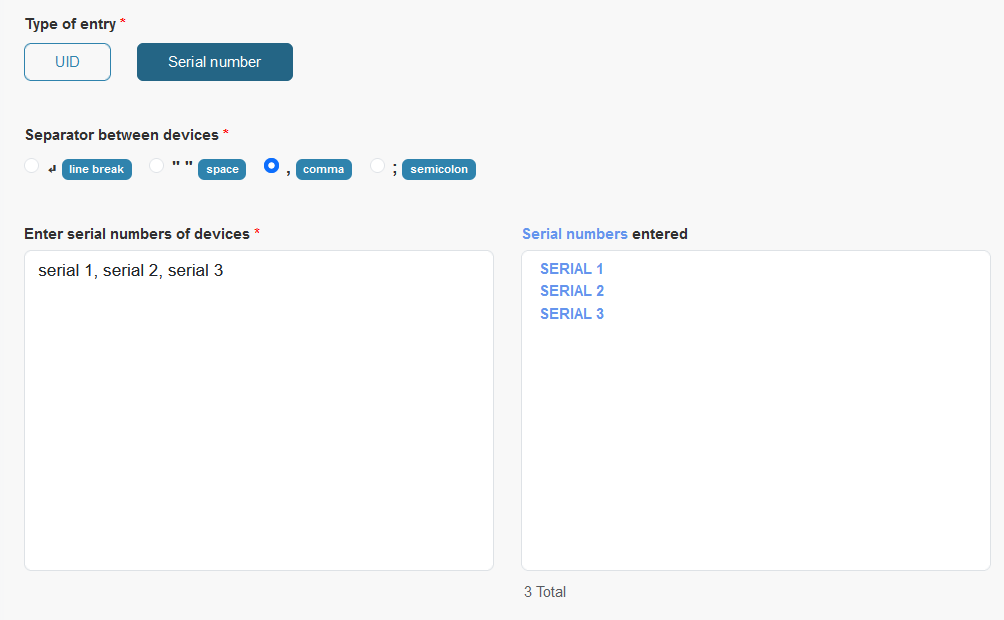
First you choose whether you want to add your devices via their UID or serial number, then you choose which separator to put between the identifiers (carriage return, space, comma or semicolon). You can then enter all your identifiers in the text box on the left. Recognized identifiers are displayed in the right-hand block.
For example, below we add three devices with their serial numbers and commas between them:

¶ Case 2: Manual matching
You can choose :
- use only the UID. In this case, it will be the only identifier for your devices, and you won't be able to use the serial number in ZOZIO's MAMS and Robin platforms. The procedure is the same as for case 1.
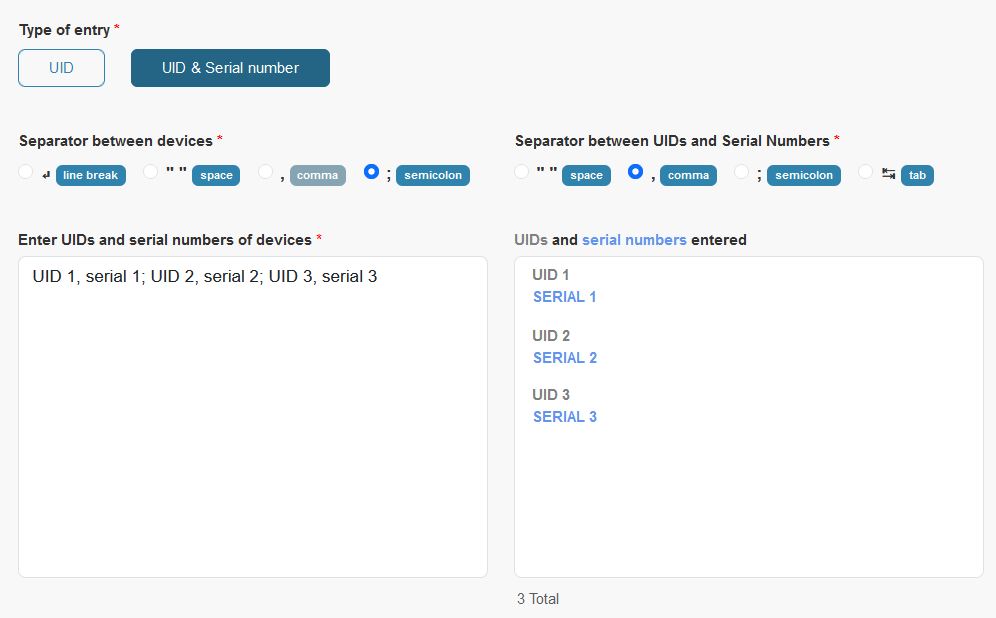
- use UID and serial number. In this case, you need to explain the connection between the two, as shown below.
If you choose to provision UIDs and serial numbers, you must select :
- which separator to use between devices (space, comma or semicolon).
- which separator to use between UIDS and serial numbers on the same device (line break, space, comma or tab).
You can then enter all your UIDs and serial numbers in the left-hand text box. Recognized identifiers are displayed in the right-hand block. You should always enter the UID and then the serial number.
For example, below, we add three devices with their UIDs and serial numbers, putting commas between UIDs and serial numbers and semicolons between them:

¶ Step 5: Select provisioning status
You need to define the status of your devices when you add them. The possible statuses are summarized in the table below.

| Status name | Meaning |
|---|---|
| In service | Device in service, deployed |
| RMA | Dysfunctional equipment identified at customer site |
| Spare | Spare unit stored on customer's premises |
| Refurbishing | Device being repaired by supplier |
¶ Step 6: Power supply type
Caution: selecting the wrong type of power supply will result in erroneous calculation of device consumption and unreliable low battery alerts.
You have to choose how your appliances are powered. Most of the time, this means choosing the type of battery present in the devices.

¶ Step 7 (optional) : Equipment designation
You don't like your devices to be called by their UID or serial number? You prefer to give them a clear name, representative of their location, shape, etc.: that's what designation is for! All devices added will have the designation you enter in this input field. You can change it later if you like.

¶ Step 8 (optional) : Customized offline duration
It is recommended to select an offline duration greater than the life support signal duration of the devices
The devices on your site switch from online to offline status if they have not communicated for longer than the time configured in the site settings. See the settings section of offline duration of the site. However, if you want certain devices to have a shorter or longer switchover time, you can define this time for the devices you add via the "custom offline time" field.

¶ Step 9 (optional): Add labels
You can optionally add labels to devices about to be added, with free or predefined information. This information will then be attributed to all newly added devices. To add more, click on the blue "Add label" button. To remove a label, click on the red garbage can to the right of the label to be removed.
For example, here we specify a deployment date and the color of the enclosures.

¶ Final step: Add devices
At the end, simply click on the blue "Add" button at the bottom of the page to add your devices. This is also when you can export (CSV or xlsx) the list of devices added and the values entered!