This configuration requires Robin version 2025.2 or later.
¶  Background
This documentation will help you discover which forms can be configured on Robin, what they are used for and how to set them up efficiently. You'll find explanations of the different types of form, their uses and the steps required to set them up correctly.
¶  Which forms are available and when?
 Forms can be used to manage different types of assets, such as production orders, containers, supports, pallets, storage racks, logistics vehicles, handling bins, machines in production, etc.
 These assets can be tracked using indoor and outdoor tracking devices, called tags, if this option is activated, it allows you to know your position in real time.
 Here are the available forms and their uses :
 Asset creation : Adds a new asset to the system (eg. : a new production order, a new transport cart, a storage bin).
 Asset creation and pairing : Creates an asset and immediately associates it with a location tag (e.g. : associate a forklift with a tag to track it around the factory).
 Asset modification : Update the information on an existing asset (e.g. : modify the status of a storage bin, update information on a container being shipped).
 Asset modification and pairing : Modifies an asset while re-pairing it with a tag (e.g. : changing a truck's tag when it moves from one warehouse to another to ensure its logistical tracking).
 Asset unpairing : Dissociates an asset from a location tag (e.g. : a completed production order that no longer needs to be followed up).
 Device unpairing : Dissociates all the assets linked to a tag (e.g. : reset a tag before assigning it to a new asset).
 Asset deletion : Deletes one or more assets from the system (e.g. : removal of a used storage bin from logistics tracking).
  This action is irreversible and must be used with full knowledge of the facts.
 Deletion of assets linked to a device : Deletes all the assets associated with a given tag (e.g. : cleaning up tag associations before reusing them on other assets). This action is irreversible and must be used with full knowledge of the facts.
¶  Configuring form widgets
Only users belonging to a group of rights of level manager or superior can configure these forms.
¶  Widget type selection
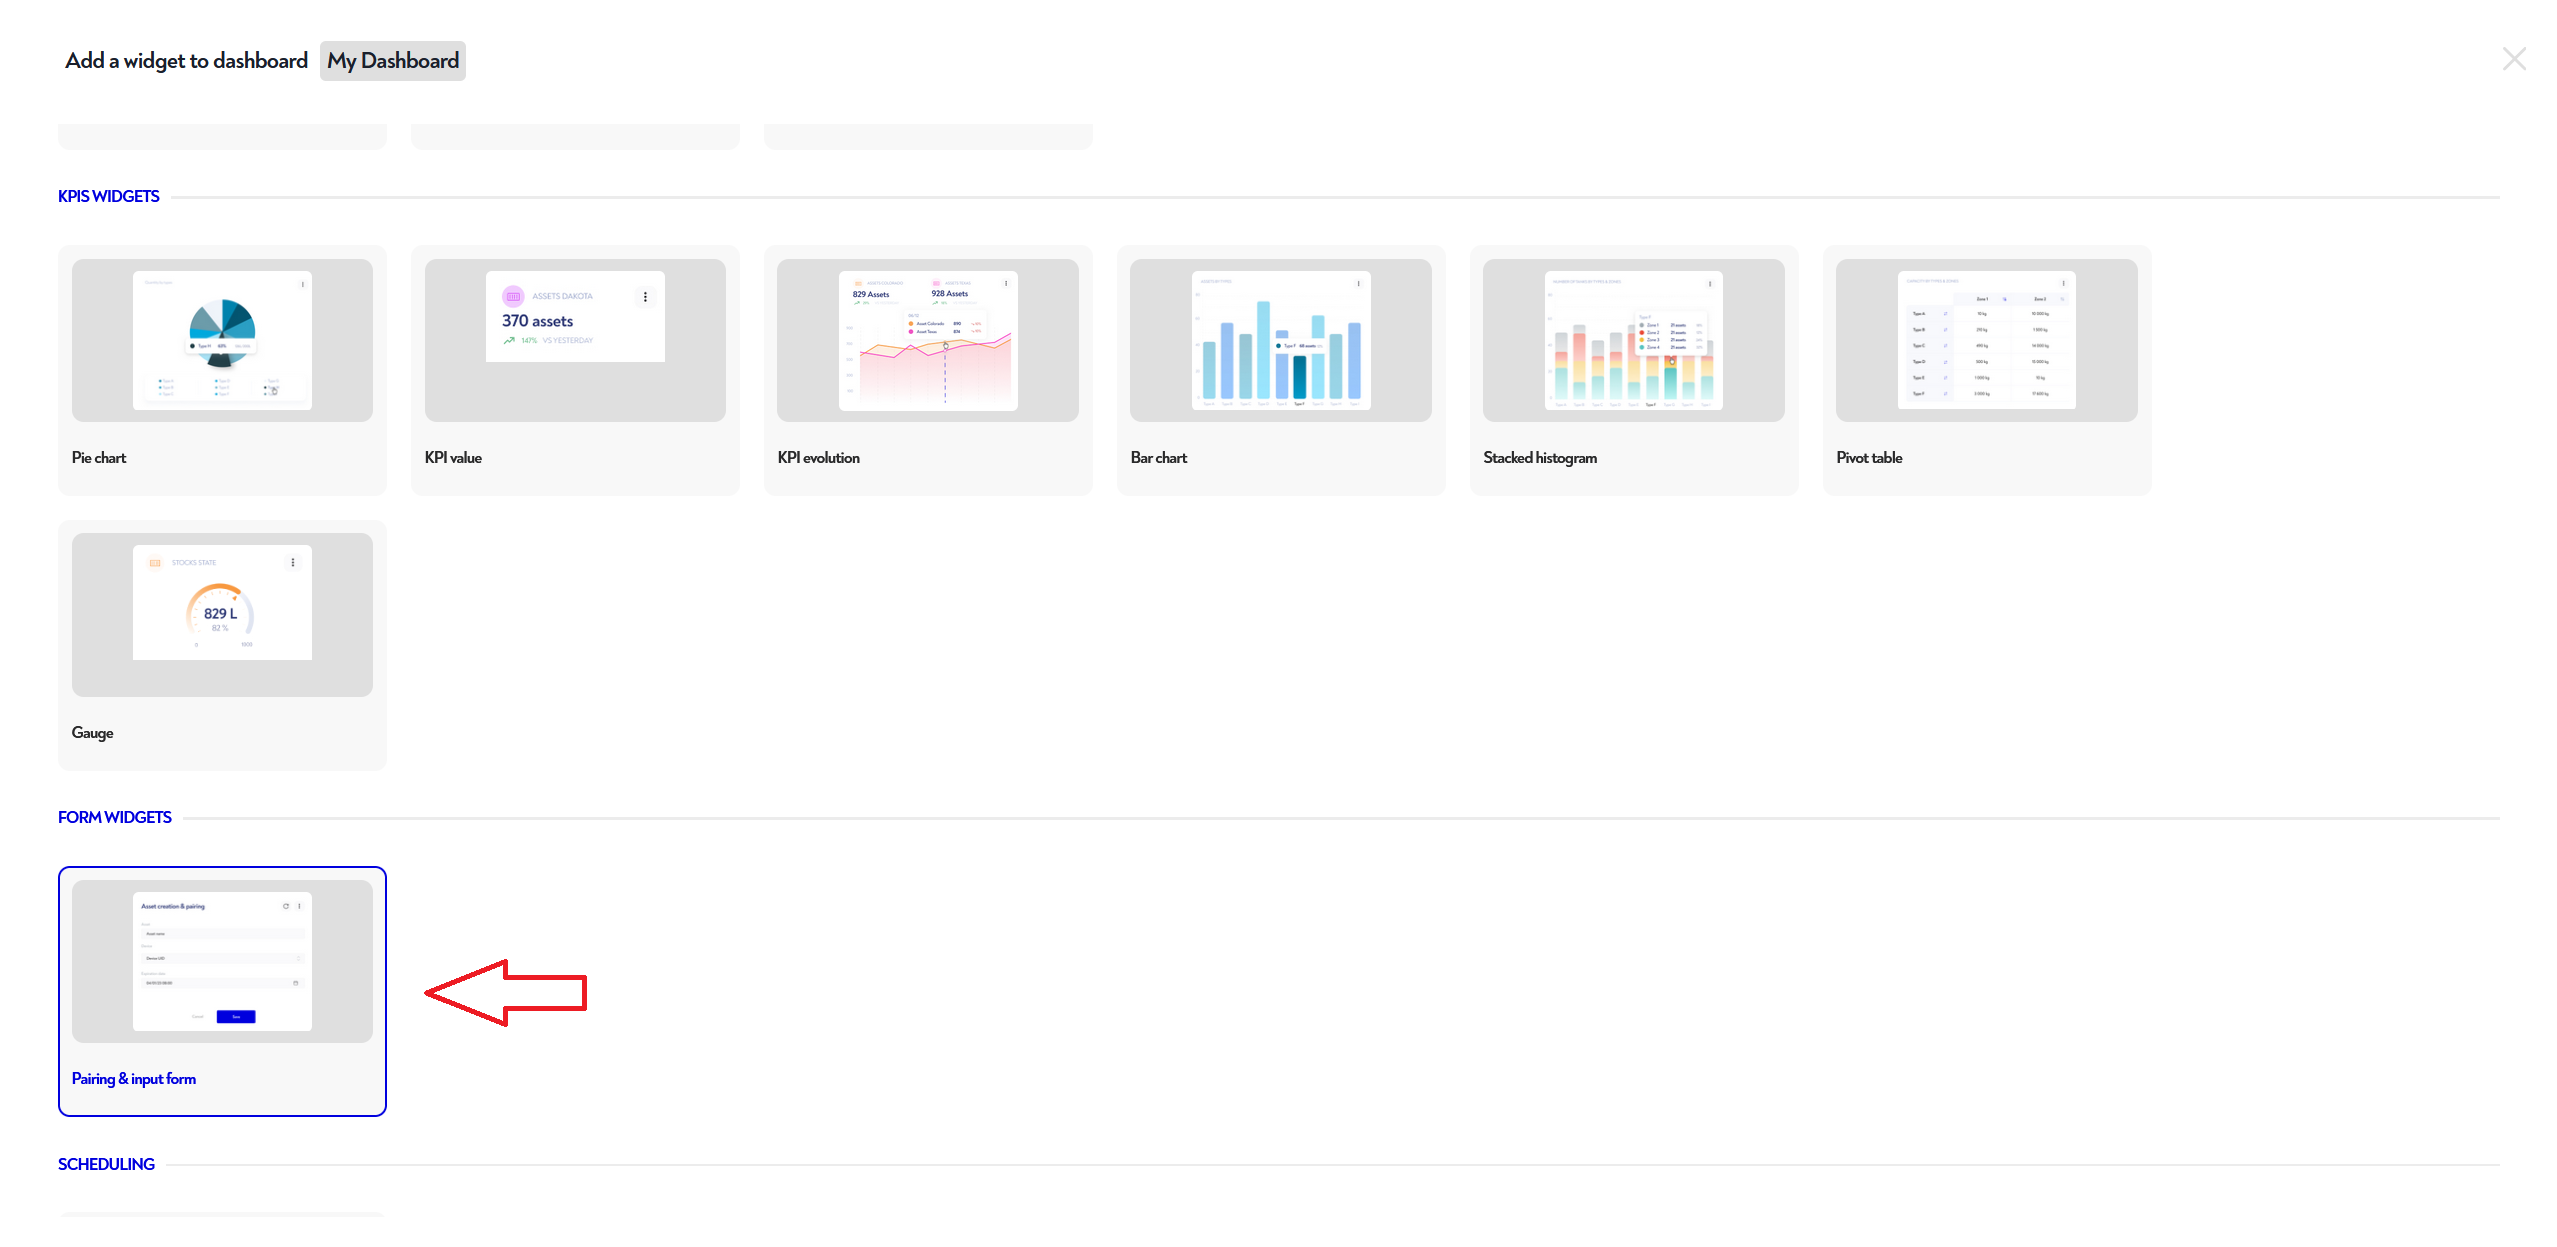
To begin, select the type of widget you wish to add from the list of available widgets. For this configuration, choose "Pairing and Data Entry Form Widget". To find out more, see Adding a widget
Then click on the blue "next" button at bottom right.
¶  General form configuration
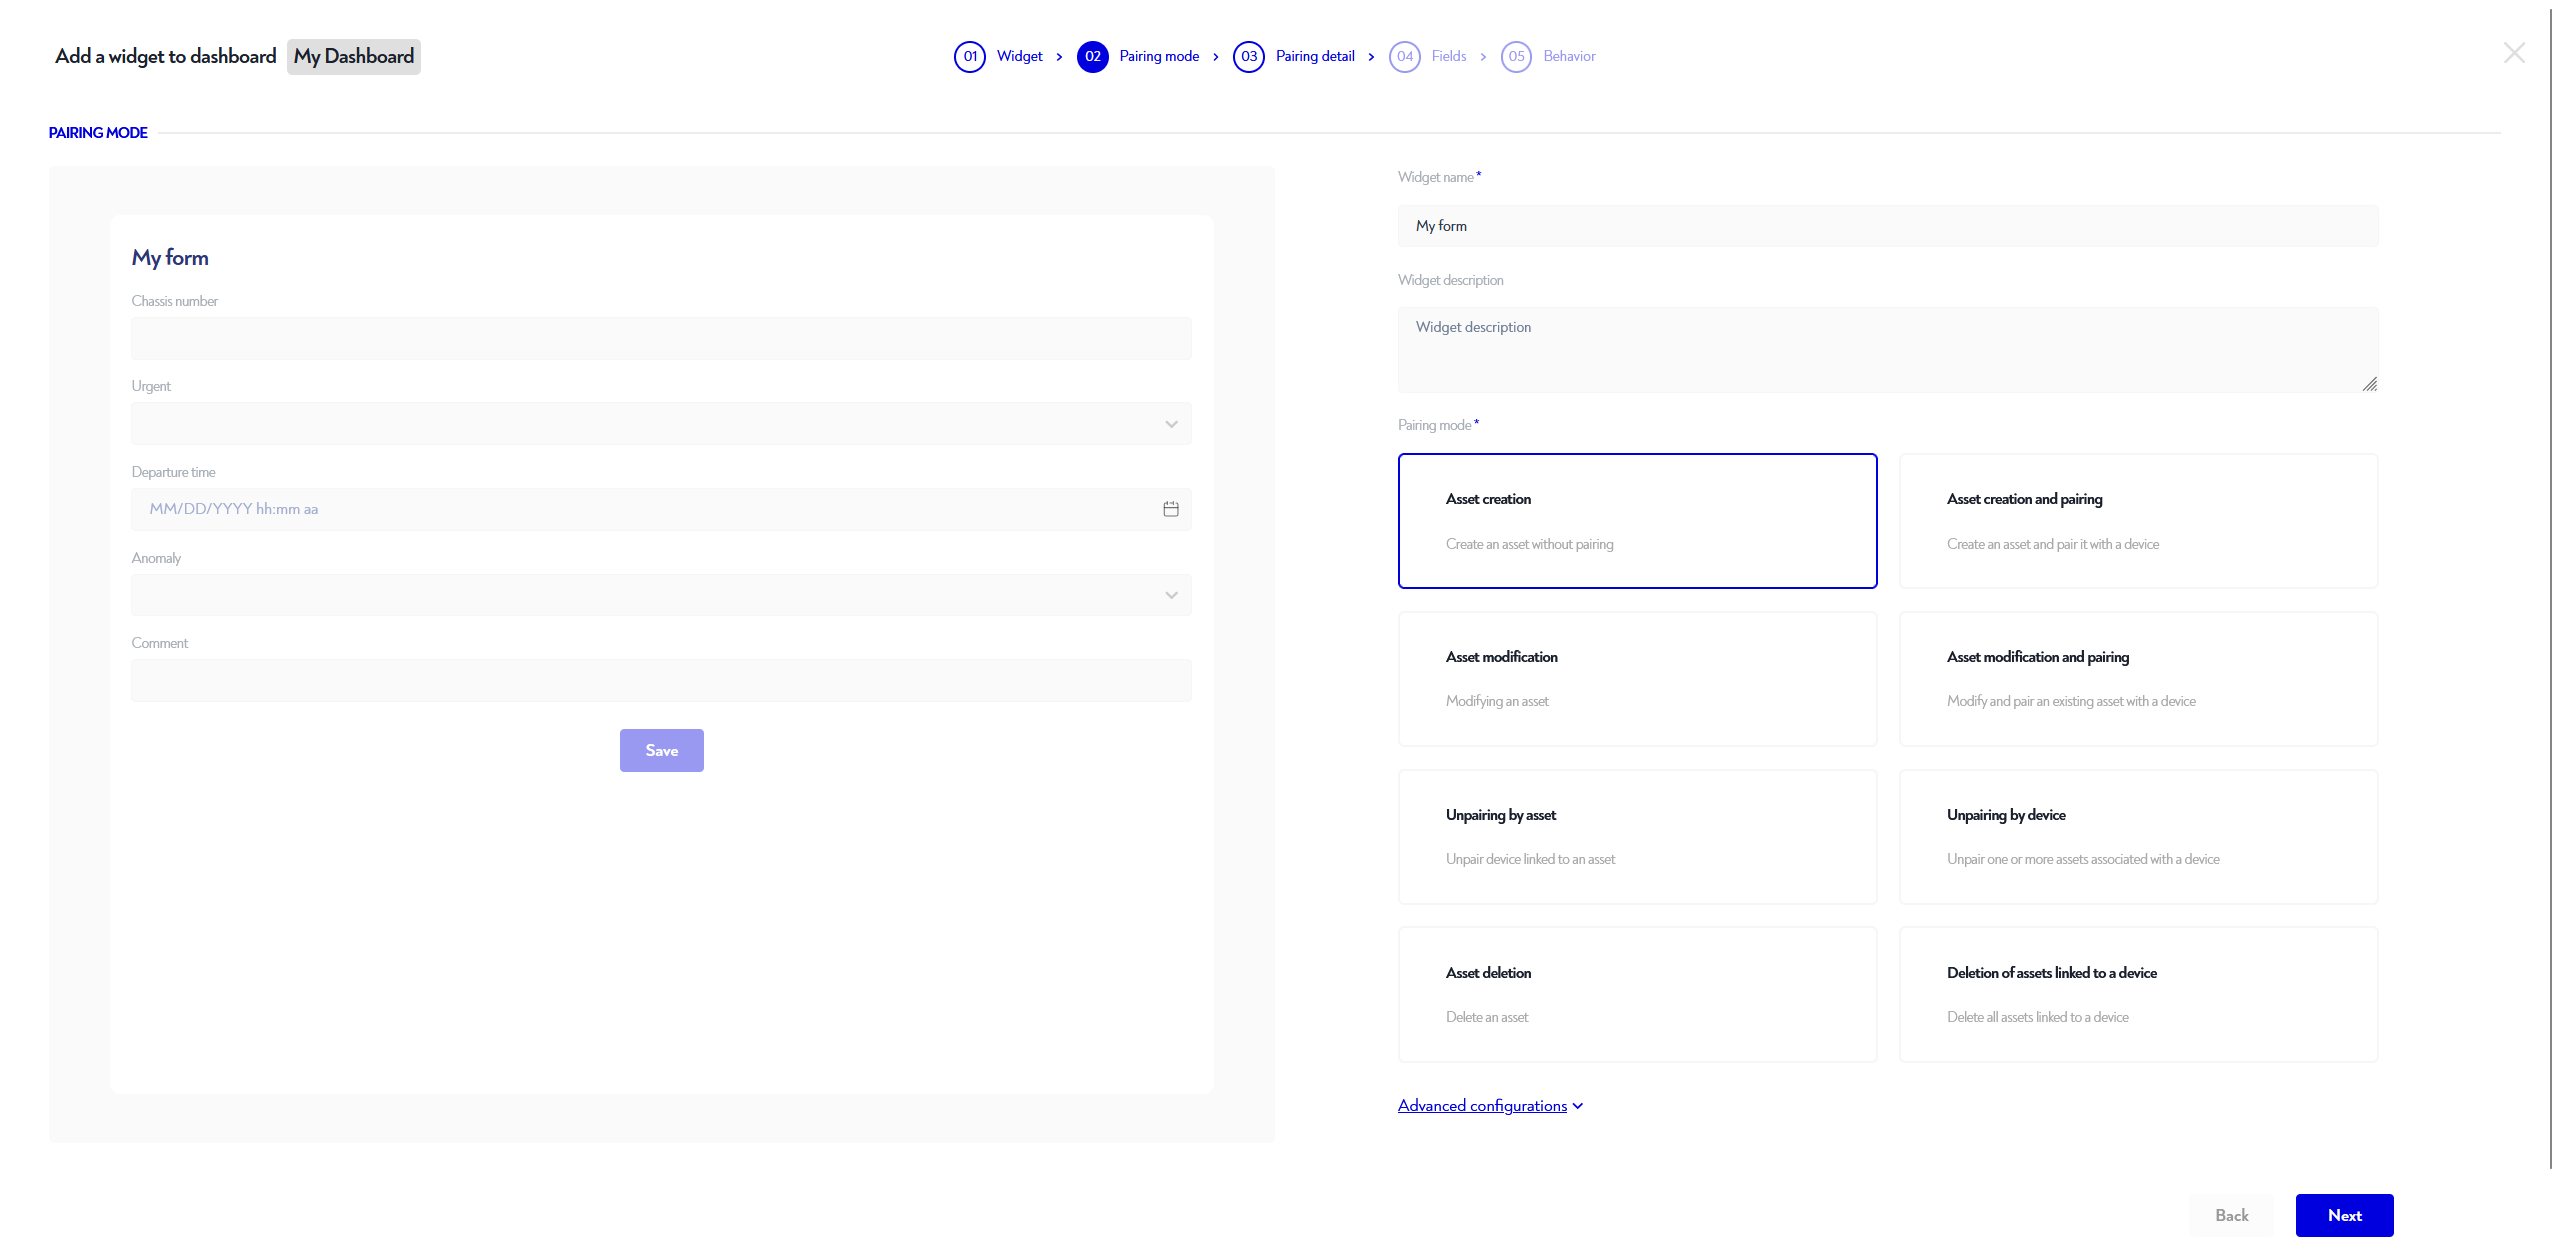
In this step, fill in the following information:
 Widget name : Choose a clear, explicit title for your widget to make it easy to identify.
- Form type : Select one of the 8 types of form available, depending on the intended use.
 Widget description (optional) : Adds a description to clarify the widget's use. This description will be displayed when hovering over the widget title.
- Advanced options : Activate or deactivate additional parameters, such as mobile display, if the form is to be used on mobile devices.
Then click on the blue "next" button at bottom right.
¶  Specific form configuration
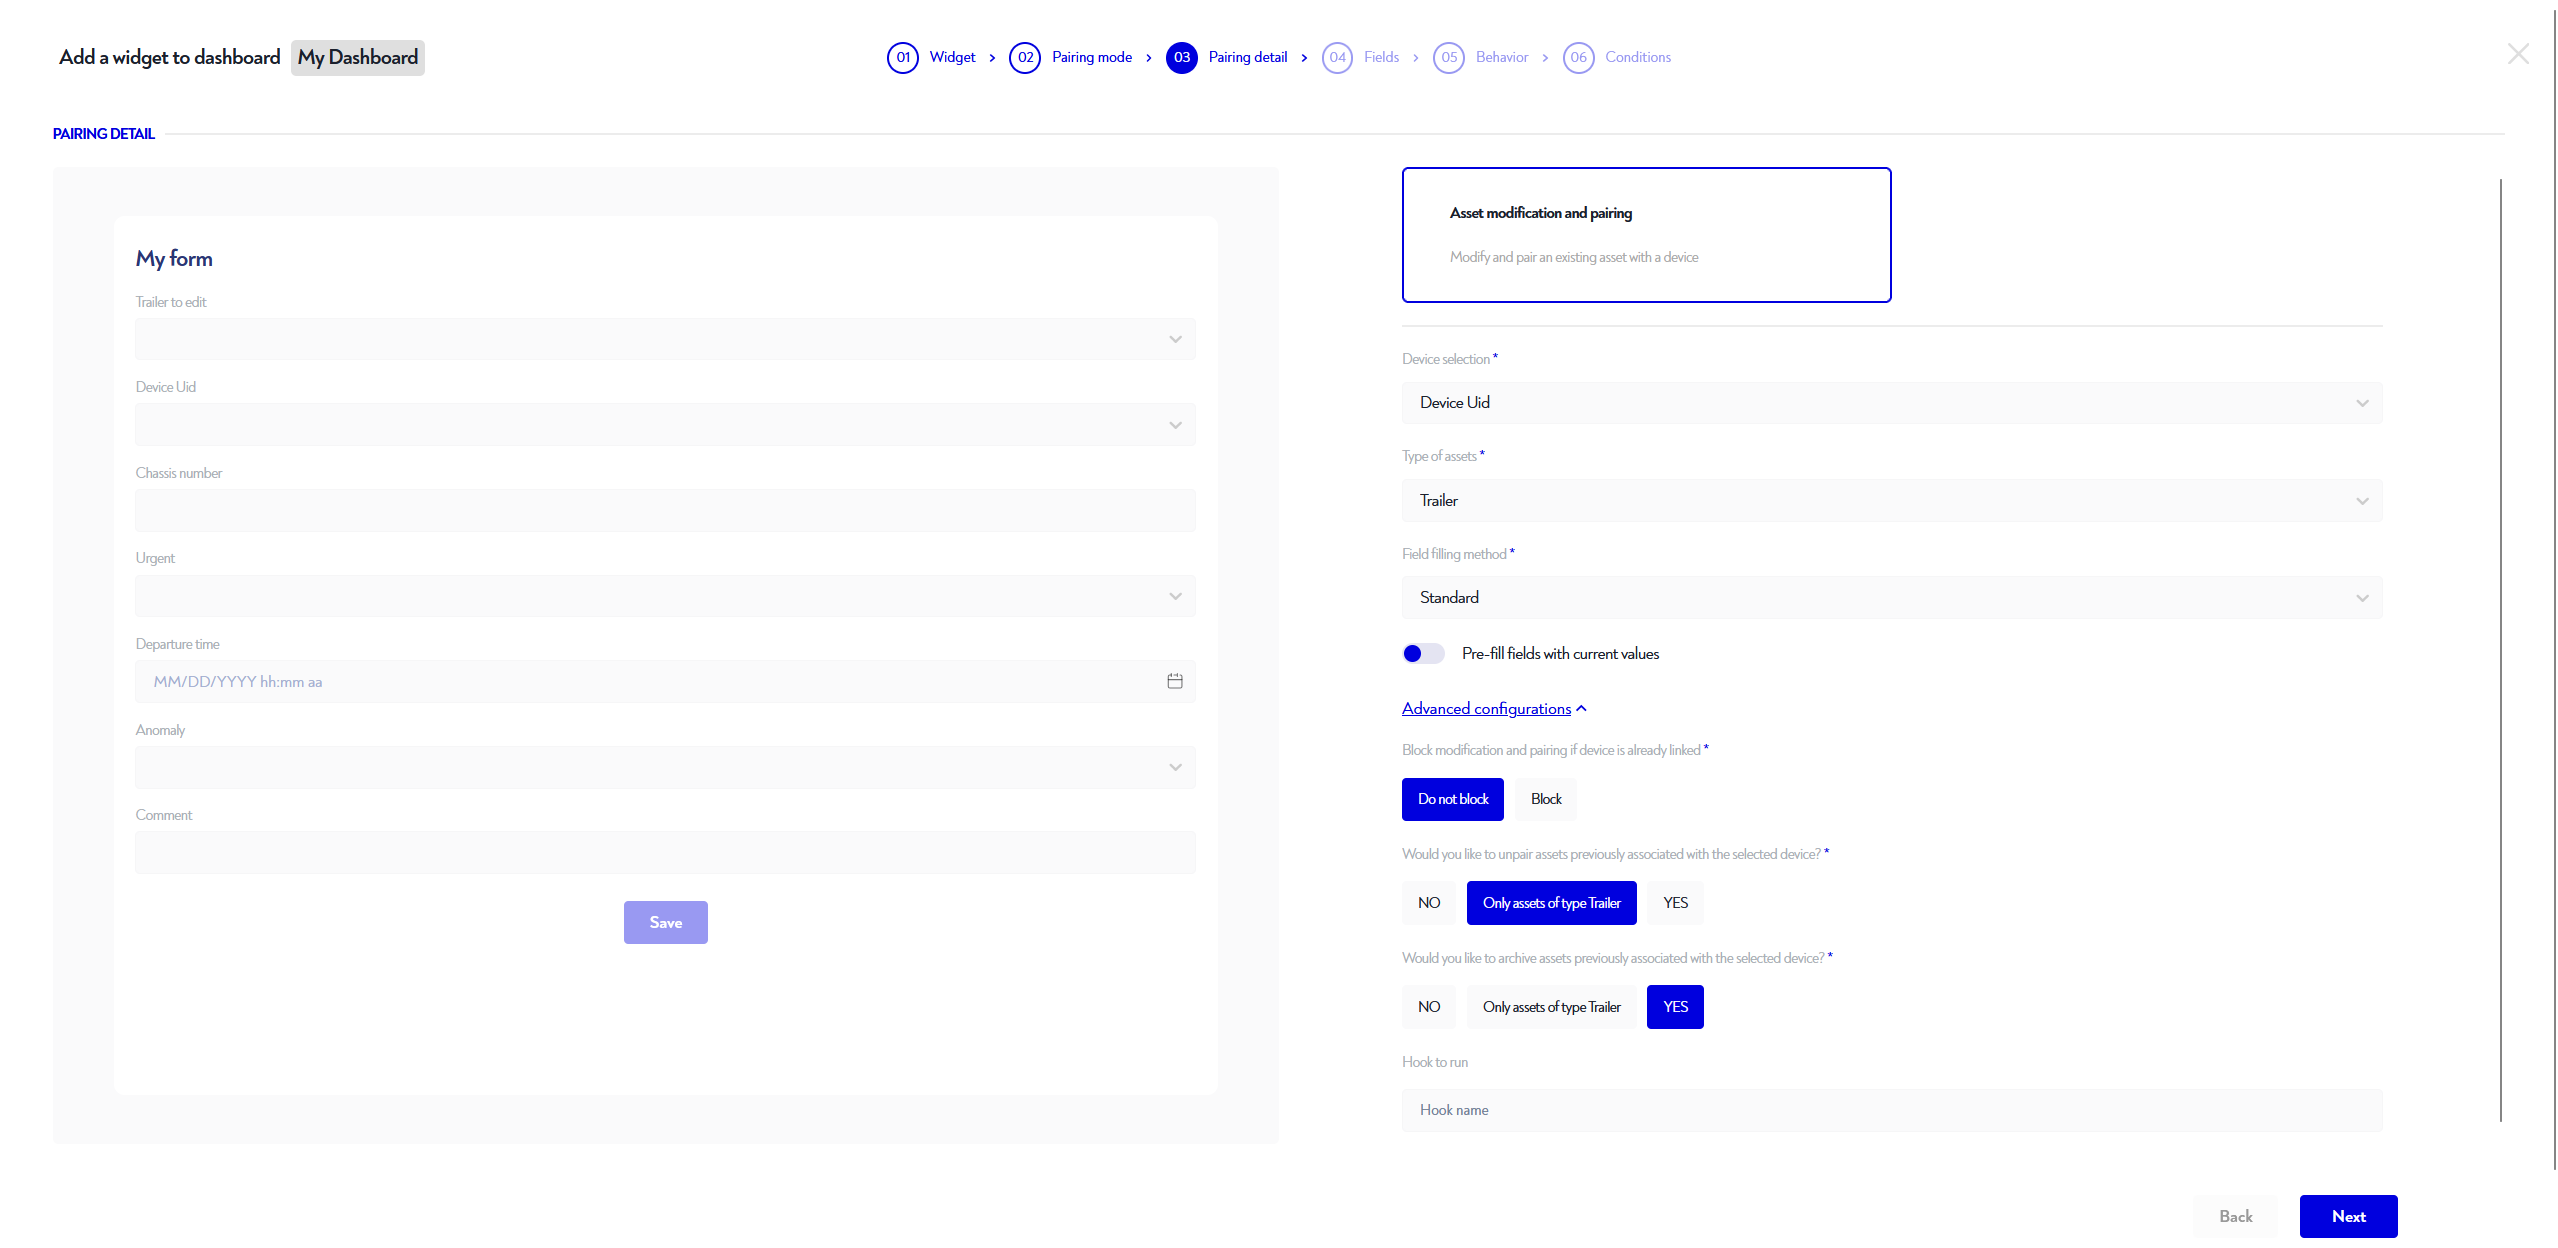
Depending on the type of form selected, enter the appropriate parameters:
 Asset type selection : Defines the asset concerned by the form (ex. : cart, pallet, bin).
- Field filling method (only for creation and modification forms) : Choose between standard (default) and coding system.
- Standard : The user fills in the fields manually in the defined order.
- Coding system : Allows you to complete the form by scanning in any order. Each field is automatically identified by a unique prefix. For example, all references begin with "REF", enabling the system to detect and associate scanned values with the right fields without sequence constraints.
 Advanced options
These options are available depending on the type of form selected:
 Block pairing if tag is already linked (create/modify) : Prevents an asset from being associated if its tag is already in use.
- Archive assets previously linked to the tag (create/modify/unpair) : Automatically archives assets that were linked to the tag prior to the new operation.
- Unlink assets previously linked to the tag (create/modify) : Removes the association of previously paired assets before linking a new asset.
 Pre-fill with current value (change) : Loads current asset values for modification without requiring full manual entry.
Then click on the blue "next" button at bottom right.
¶  Customize Fields
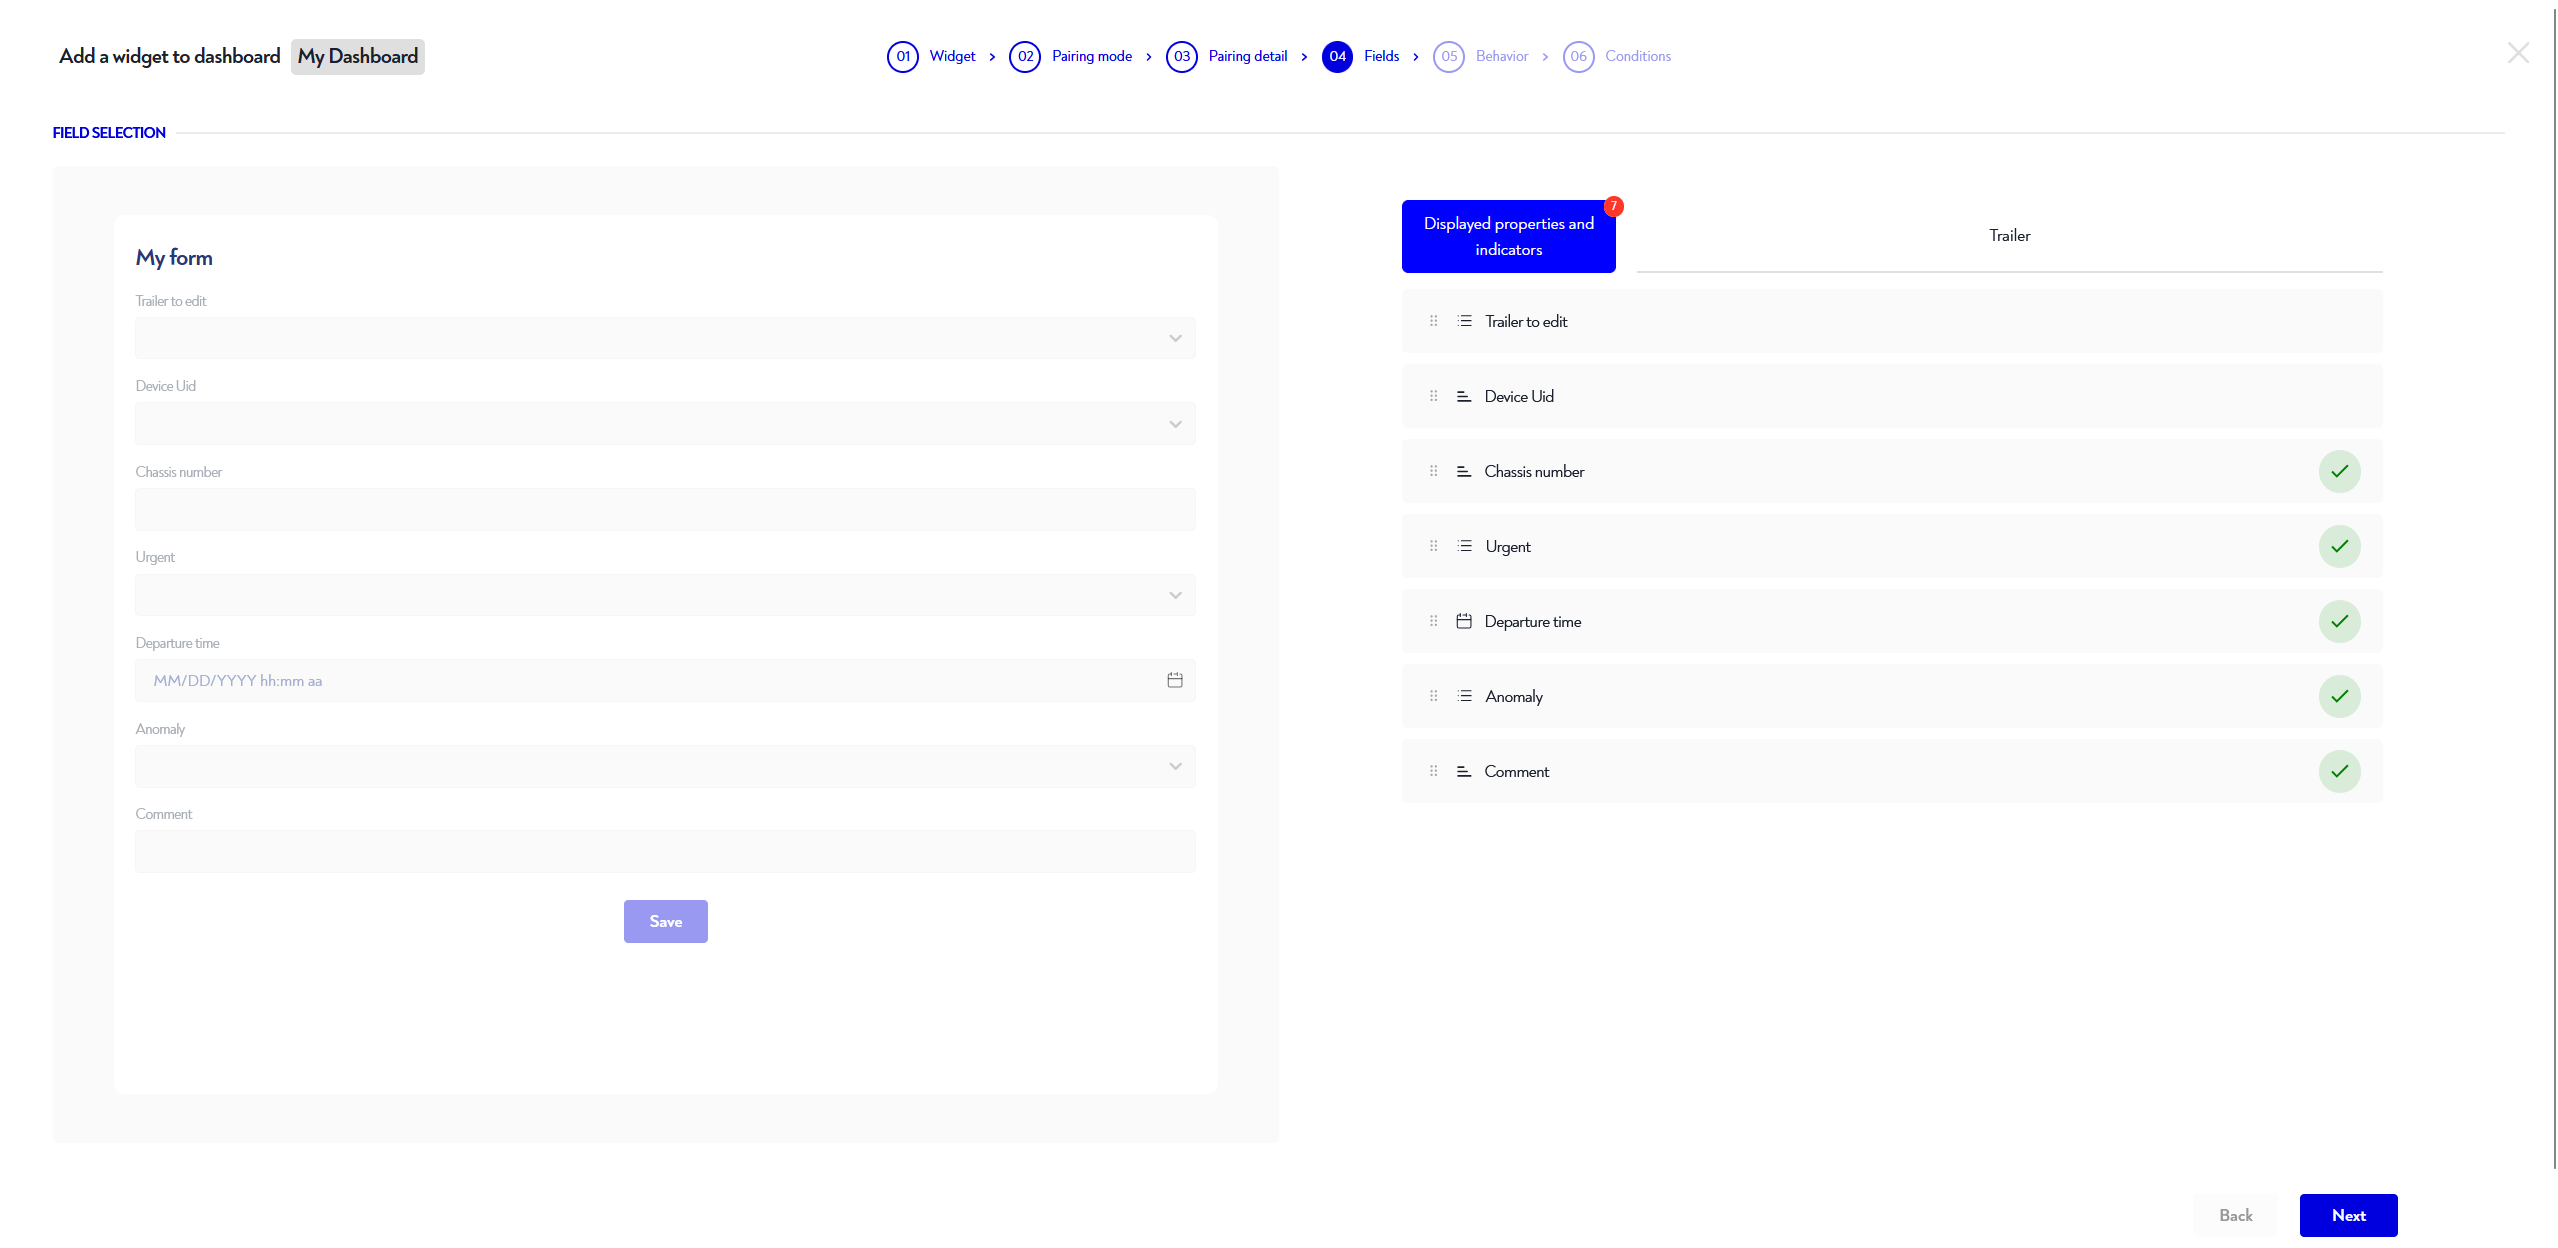
If the form is a creation or modification, you have to choose which features to fill in/update according to your needs:

 Add or remove fields : Define the information to be entered.
 Reorganize fields : Modify the order of fields to optimize the user experience.
Then click on the blue "next" button at bottom right.
¶  Definition of input modes
At this stage, you can define the behavior of certain input fields:
If the form is a creation or modification and contains some numeric fields, this step defines how the values are to be saved:
- Overwrite current value : Replaces the current asset value with the new entry. (e.g. : inventory)
- Add to current value : Increment the current value with the new entry (e.g. : addition of stock).
- Remove at current value : Decrements the current value according to the input (e.g. : stock removal).
This configuration is particularly useful for inventory management, for easy entry of incoming and outgoing stock, as well as for the inventory management by dynamically updating quantities.
For each of the date or text properties, you can define whether their entry is mandatory or optional.
Then click on the blue "next" button at bottom right.
¶ Definition of coding system
If the form uses the filling mode coding system, this step associates a unique prefix with each field selected in step 4.
- Coding definition : for each field, the user must assign a unique prefix to identify it during scanning.
- Coding management : Choose whether the prefix should be retained in the value of the saved field, or whether it should be removed before saving.
For example, if all references begin with "REF", the system will automatically identify the corresponding fields, regardless of the order in which they are entered.
Then click on the blue "next" button at bottom right.

¶  Conditions
If the form is a a modification of assets, you can add conditions to limit which assets to modify.
For example, you can create a form for editing production orders restricted to a given perimeter. Only production orders within this perimeter can be modified, deleted or cancelled.
To do this, we add conditions to filter the list of assets present in the form. Click on "Add a condition", selecting the property or indicator you wish to filter, here "location", and selecting the "=" operation in this case, then selecting the desired value (e.g. "Manufacturing" location).
¶  Post input
This configuration requires Robin version 2025.6 or later.
If the form is a a creation or modification of assets, you can add modifications to the form's post-input properties.
For example, you can automatically fill in the date of entry.
To do this, add modifications: click on "Add modification", select the property you wish to modify, here "entry date", then the desired value (for example, the "execution time" location).
Then click on the blue "Add" or "Edit" button at bottom right.
¶  Congratulations!
You now have all the information you need to configure a form widget correctly. Good configuration!
Is this page unclear or do you need help? Don't hesitate to contact us at support@zozio.tech !